

How To Increase Internet Speed In Windows 7 Without Software
Talking about the biggest revolutions the IT world has ever witnessed, the emergence of internet tin can never be missed out. Simply put, internet has completely inverse the way we call back, motion, and progress in the world. However, to make full use of this astonishing engineering and achieve the maximum, information technology is important that users raise its functioning, and make this web service run to its fullest potential.

This article mentions a few tricks and tips that can help you attain exactly that, and have the cyberspace feel to a higher level. Windows 8 users can refer to this commodity for internet speed up tips, while Windows vii users go on reading the tips below:
Tip ane : Monitor Internet Usage Using Windows 7 Resource Monitor
One of the main reasons contributing to a slower internet speed is the sharing of bandwidth by multiple programs. While you lot may take opened only Chrome, you will be surprised to know that there are various background processes using the net resource, and chipping away at full bandwidth. To finish such programs and increment internet's efficiency, use the Windows 7 built-in tool, Resource Monitor. This tool can assistance you view all programs currently using the internet and stop any that y'all feel is unnecessary or unwanted.
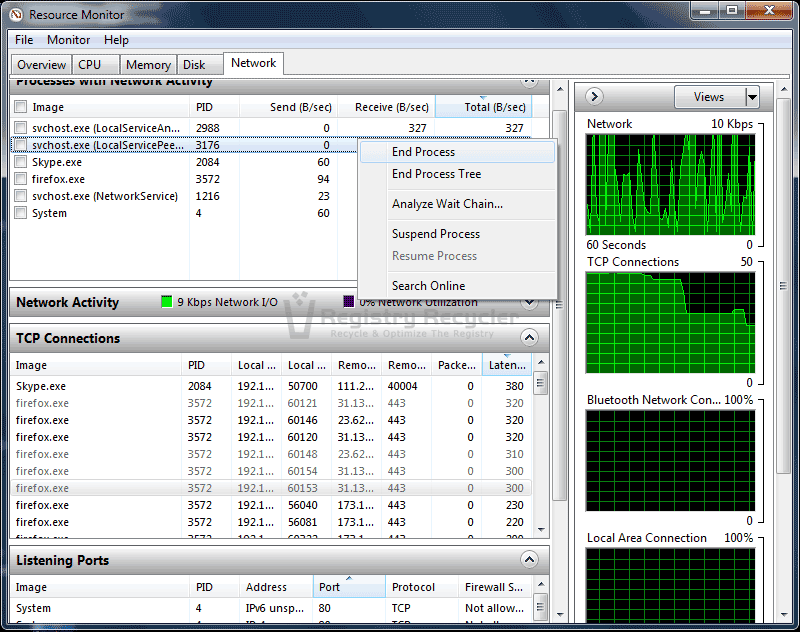
Resources Monitor
Resources Monitor debuted with Windows Vista has been appearing in Windows since then. However, in Windows seven, Microsoft enhanced its features which allowed users to monitor CPU, Retention, Disk, and Network usage on a single platform.
To use this monitoring tool to enhance net's speed, follow the steps below:
- Open up Resource Monitor by navigating to:
- Outset -> All Programs -> Accessories -> System Tools -> Resource Monitor
- Resource Monitor panel initially opens in the Overview tab. Navigate to the Network tab
- Under Processes with Network Activeness, you lot can see the list of processes with their respective sending and receiving bytes.
- For in-depth traffic assay expand TCP Connections category to view all programs using the TCP protocol and thus making apply of internet for various purposes.
- If you lot wish to close whatsoever application and limit its internet usage, in Processes with Network Action view right-click the process and click End Procedure
Ti p 2: Use netstat Command to Monitor Network Utilization
Using Resource Monitor is not the only way to view all internet-using programs, and terminating the ones institute unneeded. Another effective ways is to use the netstat utility from control prompt. Netstat is a command-line tool that is used to detect network issues and determine the corporeality of network traffic as a operation measurement. To utilise netstat for enhancing network'southward speed and its power, encounter the post-obit steps:
- Click Start and type command prompt in the Search box
- Locate and right-click Command Prompt, and so cull Run every bit administrator to launch information technology with administrative privileges
- In the black screen, blazon command netstat –o –north and and so hit Enter
- This volition brandish various programs and applications currently connected to the network.
- Notice the last column listing PIDs. PID or Process Identifier is a number used by Windows kernel to uniquely place a process.
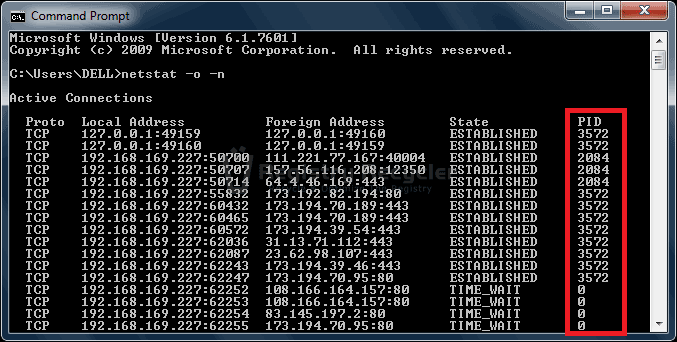 Notation downwards the PIDs that are occurring the most. The applications associated with these PIDs are the ones that are using the almost network/internet resources. To inquire further near these programs, continue with the following steps
- Open Task Manager past pressing Ctrl + Shift + Esc fundamental
- Open View from the top carte du jour and then select Select Columns. Enable PID (Process Identifier) and then click OK
- Adjacent, click on the Processes tab and look for the PIDs that were noted previously.
- If you wish to stop this program, highlight the program and click on End Process

Tip iii: Manage Internet History, Cookies and Enshroud
Internet history, cookies, and cache form a part of the temporary internet files that tin burden your system and consume actress disk space. This cannot just lower your internet speed, but also slowdown overall PC performance. Information technology is therefore highly recommended that you delete these files regularly to enhance system performance and avoid unnecessary accumulation of this temporary data.
To delete these temporary internet files from your Windows 7 organisation, use the Windows Deejay Cleanup tool every bit demonstrated below:
- Navigate to Start -> All Programs -> Accessories -> System Tools -> Deejay Cleanup to launch Deejay Cleanup utility
- Choose the Bulldoze you want to clean upward. Usually Temp folder is institute on C bulldoze
- Locate and bank check Temporary Internet Files.
- Click OK and then confirm your choice past pressing Delete Files push
In order to command and manage temporary internet files, follow the beneath mentioned steps:
- Press Windows key and then type internet options. Click the link Cyberspace Options
- Open up the Full general tab and click Settings in the Browsing history category.
- Under Temporary Internet Files tab on the Website Data Settings box, lower the Deejay space to apply to 50MB
- Click the History tab and lower the Days to keep pages in history to five
- At present, open up the Caches and databases tab and uncheck the selection Allow website caches and databases.
- Click OK to relieve the changes
Tip 4: Remove DNS Cache
DNS enshroud is used to store name resolution information of websites, application servers, network shares, etc. Occasionally, this data becomes poisoned when attacked by viruses, causing unauthorized domains, or IP addresses to pave their way into the system. Corrupted DNS cache can hamper the network'southward operation badly and also lead clients to malicious websites or servers.
Information technology is therefore, recommended to clean DNS cache regularly by following these uncomplicated steps:
- Open up Command Prompt with Administrative privileges
- In the elevated command prompt that opens, type ipconfig /flushdns
- Upon successful completion of this step, you will see the following bulletin:
Windows IP configuration
Successfully flushed the DNS Resolver Cache

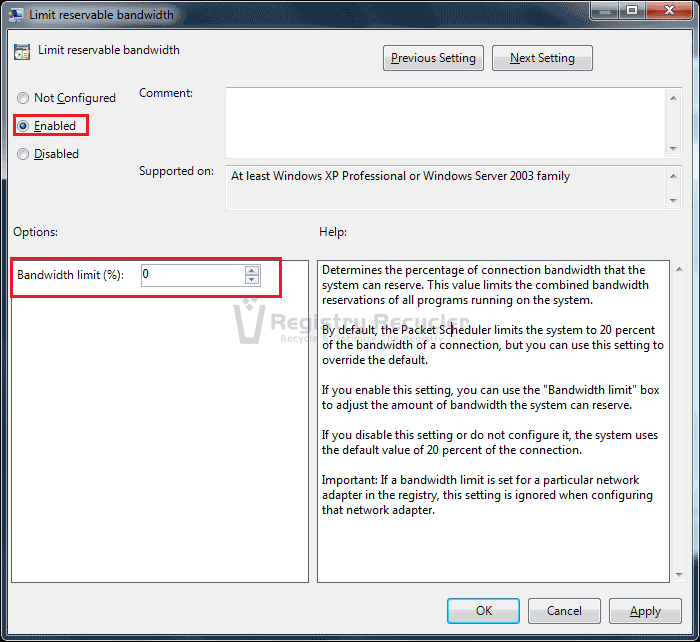
Tip v: Limit Reservable Bandwidth from Local Group Policy Editor Panel
By default, Windows 7 reserves 20% of the network bandwidth for QoS (Quality of Service) traffic, such as Windows Update and other important background services. Such applications are quality witting and require sufficient bandwidth to communicate efficiently over the network. Yet, if these programs are not in apply, the allotted resources are wasted and the efficiency is profoundly reduced. Therefore, information technology would be helpful to limit this reserved bandwidth and extract the maximum out of your network. To practise this, execute the steps below:
- Open up Local Group Policy Editor by typing gpedit.msc from the Run carte du jour (Windows + R)
- Navigate to the following path:
- Computer Configuration -> Administrative Templates -> Network -> QoS Packet Scheduler
- Double-click Limit reservable bandwidth
- Select the option Enabled and then lower the Bandwidth limit (%) to 0
- Click OK to utilise the changes made and then shut the Local Grouping Policy Editor panel
Tip 6: Update your Browser
It goes without saying; having the well-nigh updated web browser can seriously heighten your internet's efficiency and increase its speed. Therefore, go the almost popular internet browsers, such as Chrome, Internet Explorer, and Firefox, and make sure they are up to date with the latest enhancements in the internet globe.
Tip 7: Update your hardware
Along with performing updates to the software, it is important that y'all make improvements in your hardware besides. Hardware concerned with the internet includes modem, router, LAN card, and network wires. Make certain you lot acquire the latest components with high speeds and utilize good quality cables to conduct your data. Furthermore, make certain yous maintain a nice and clean environs surrounding the components, and identify the router/modem in a well-ventilated atmosphere to avoid overheating.
Tip 8: Remove virus/spyware/malware
Unwelcomed guests in your PC can considerably slower PC's functioning and directly impact your internet's working. Remove such harmful elements from your Windows 7 calculator past performing a full arrangement scan with your security application. If don't own one install Microsoft Security Essentials for free. Keep your security software updated to avert futurity intrusions.
We RECOMMEND
Source: https://www.registryrecycler.com/blog/2014/02/how-to-speed-up-your-internet-in-windows-7/
Posted by: carrollkhorde.blogspot.com
0 Response to "How To Increase Internet Speed In Windows 7 Without Software"
Post a Comment